There are more than a handful of original Arduino boards and 100% clone Arduino boards in the market, and which one is for me? In fact every Arduino boards are built to suit different need, below are some of them that are more popular:
1. Arduino UNO

Arduino UNO
Arduino UNO is one of the most famous board in Arduino family after Arduino Duemilanove. It is the latest design of the basic USB board. It comes with 6 analog inputs, 14 digitals output where 6 of them support PWM, and 16Mhz clock speed. Arduino UNO comes with 6 analog inputs and 14 digital I/O where 6 of them are PWM outputs. It is running on a ATmega328 processor with 32kB flash memory. The clock speed of this Arduino board is 16Mhz with the dimension of 68.6mm x 53.3mm. There are a lot of shields build to expend its functionality.
Sponser Links
You can get the latest Arduino R3 board from Amazon (Official Reseller) for a reasonable price or you can search for previous revision R2 at lower price in the Amazon.
2. Arduino Mega

Arduino Mega2560
Arduino Mega is a larger and more powerful Arduino board. There are 2 types of Arduino Mega in the market, both of them are having the same dimension of 101.6mm x53.3mm, having 16 analog inputs and 54 digitals I/O (14 that support PWM). Even though both of the Arduino Mega and Mega256 are running on the same clock speed of 16Mhz but in reality they are built with 2 different processors, Mega is built on ATmega1280 processor with 128kB flash and Mega256 is built on ATmega2560 processor with 256kB flash. These Arduino boards is suitable for those projects that need more inputs and outputs.
Arduino Official Reseller is selling the original R3 version of Arduino Mega in Amazon and you can get even cheaper from other reseller for a R3 or non-R3 version.
3. Lilypad Arduino

LilyPad Arduino
Lilypad Arduino is famous of its design, it is different from other boards, it is not in rectangle shape but in a round shape of 50mm diameter. It is designed for flexibility so that it is easier to wear, you can stitch it on any fabric.

LilyPad Arduino is designed for Flexibility
It is running on either ATmega168V or ATmega328V processor which is low power version of ATmega168 and ATmega328. It has 16kB of flash memory, 14 digitals I/O with 6 that support PWM, 6 analog inputs and with the clock speed of 16Mhz.
You can get this flexible Lilypad Arduino from Amazon or if you want the kit that comes with more components you can order the Lilypad Pro Kits from Amazon.
4. Arduino Nano 3.0
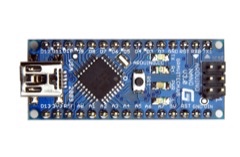
Arduino Nano 3
As its name, Arduino Nano is a compact and breadboard-friendly version board based on ATmega328 processor. It is more or less same functionality as the Arduino UNO but in different package. Instead of using the standard USB to connect to the computer, it uses the mini usb but without the power plug for external power source that built on Arduino UNO. The dimension of Arduino Nano is only 43mm x 18mm, it comes with 6 PWM I/O from the total of 14 digitals I/O, 8 analog inputs, 16Mhz clock speed and 32kB of flash memory.
The Arduino Official Shop at Amazon is selling this original tiny Arduino board, Arduino Nano 3.0 (packaging as the photo below) and it is the latest version 3 model.

Arduino Boards Comparison Chart

Sponser Links
Summary
In summary, for those hobbyists that new to Arduino, it is highly recommended to go for Arduino UNO because of its expandability, price and ease of use where you can easily connect to any computer through its USB port. For those that need more I/O and larger program, Arduino Mega2560 might be you choice. LilyPad Arduino is targeted for special project where you need to stitch it on any cloths.
You can checkout the some newer board like Arduino Due article here.
< BACK


